The 9 most common assembly mistakes with a container shelter
If you’re about to assemble your new Kroftman container shelter, be sure to read this blog first. I’ve been working at Kroftman as an engineer for six years, and I’ve designed container shelters among other products. As an engineer, I occasionally speak to customers who haven’t assembled their container shelters correctly. Fortunately, this doesn’t happen very often. A container shelter is a relatively easy product to assemble. However, I find it unfortunate when the assembly goes wrong. You can prevent this by following the assembly manual carefully. If you have any uncertainties, you can always give us a call. Additionally, in this blog, I’ll go through the nine most common mistakes made during the assembly of a container shelter. I hope to prevent you from making the same mistake(s). If you’re unsure whether you can assemble the container shelter yourself, it’s also wise to read this blog. You’ll gain more insight into how assembling a container shelter works and what challenges you might encounter. Or rather, what mistakes you should be aware of.
1. In the case of TC403, don’t forget to secure the containers with ground stakes.
It’s important that with the TC403 container shelter, you secure the rear twist lock on the outside of both containers with a ground stake. This is indicated in the diagram below, which can be found in the assembly manual of the TC403.
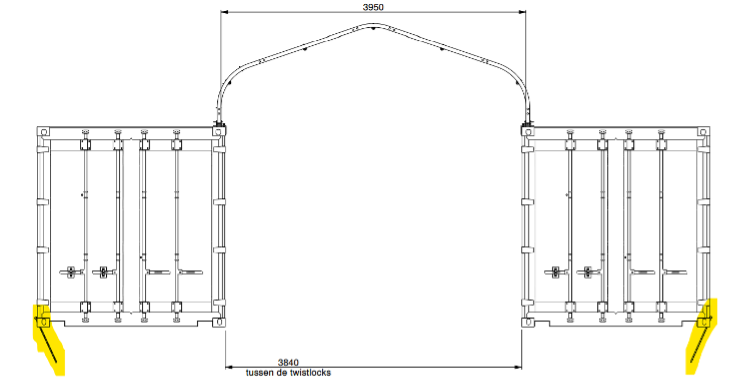
The reason you need to secure the containers with this type of container shelter is related to the installation of the tarp of the rear wall. With the TC403, it’s directly attached to the containers. When you tension the tarp, there’s a chance that you’ll pull the containers towards each other. Therefore, you need to secure them with a ground stake. For our other types of container shelters, this isn’t necessary, as the front and rear walls are attached differently.
My tip: Always make sure that the containers you’re mounting a container shelter on have sufficient weight. For example, by storing items in them.
2. Place the containers for your container shelter at the correct distance from each other
It’s important that you place the containers at the correct distance from each other. You are responsible for this, even if you have outsourced the assembly of your container shelter to Kroftman. The exact distances between the containers are clearly described in the construction drawings and assembly manuals. You can find these on our website under the downloads tab of the container shelter of your choice. Below, I’ve provided an overview of the required distance between the containers for all sizes of container shelters sold by Kroftman.
| Type of container shelter | Required distance between the two containers |
| TC403 | 3,84 meters |
| TC600 | 5,90 meters |
| TC800 | 7,80 meters |
| TC1012 | 9,79 meters |
If you don’t have enough space to maintain this distance between the containers, it is still possible to assemble a container shelter. In that case, the base rail of the container shelter will be further from the container edge. You can attach the container shelter to the container using bolts or by welding it to the container. In this scenario, you cannot use Kroftman’s container clamps to attach your container shelter. If you want to use a rear wall, it is possible, although it will be too wide. You can let the tarp of the rear wall hang behind the containers. However, a front wall is not possible in this case. The uprights of the front wall construction will be in front of the container doors, and the tarp of the front wall will also hang in front.
3. Call Kroftman if your container edge is lower than 50mm
Kroftman has developed unique container clamps to easily and quickly assemble and disassemble a container shelter without damaging it (by welding or bolting it). However, you can only use these clamps on a container with an edge height between 50-80 mm. If your container edge is lower than 50 mm and you still want to use these container clamps, please contact us. My colleagues and I can discuss with you whether an insert block is an option. These can be ordered from Kroftman. Never mount a container clamp on a container edge lower than 50 mm without these blocks. You won’t be able to securely attach the container shelter to the containers, risking it coming loose.
4. Ensure proper attachment of the container clamps
When using Kroftman container clamps, make sure to insert the small screws on top first before attaching the clamp. Once the clamp is attached, you won’t be able to insert the screws afterward. The image below, taken from the manual, illustrates this well.

5. Loosely tighten the bolts of the container shelter first
When assembling the structure of the container shelter, initially loosely tighten the bolts. This creates some play and makes it easier to assemble the components of the container shelter. Once the structure of the container shelter is in place, tighten the bolts until they are firmly secured.
6. Determine the location of the container clamps first
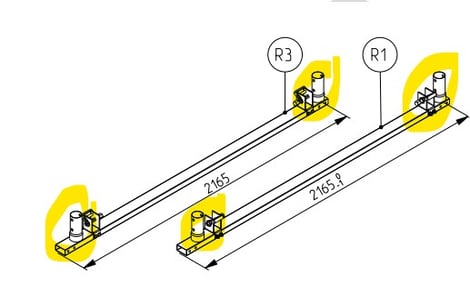
I recommend assembling the base rail and placing it in the correct location on the container. You will then see where the vertical tubes on the base rail are located. These tubes will accommodate the arches of the container shelter. In the image below, the base rail is marked with yellow circles indicating the location of the vertical tubes. You cannot place container clamps where these tubes are located. Place the container clamps as close to the tubes as possible for added stability to the structure.
7. Position the bolt knobs of the container shelter on the outside
The tarp is the most vulnerable part of a container shelter. To protect the tarp from sharp objects, position the bolt knobs of the carriage bolts on the outside of the arches when assembling the components. When pulling the tarp of your container shelter over the arches, the smooth bolt knobs prevent the tarp from being damaged. If you mount the bolt knobs the other way around, the tarp of your container shelter may tear.
8. Install the tarp of the container shelter with multiple people
Especially with larger container shelters, the tarp is heavy. Always pull the tarp manually and with multiple people over the arches. Unfortunately, I have seen several instances where the tarp of a container shelter was pulled over the arches using a vehicle such as a forklift or crane. This is usually done with too much force, which can cause the tarp to tear.
My tip: besides the people pulling the tarp, it’s advisable to have someone on the other side of the container shelter observing. This person ensures that the tarp is pulled smoothly over the arches without getting caught on anything.
9. Ensure a flat surface when attaching a front and/or rear wall
If you have chosen a front and/or rear wall for your container shelter, a flat surface is essential. The construction of these walls consists of vertical tubes with a base plate that should touch the ground. If, for example, one container is higher than the other, one leg will be too long and the other too short. In any case, you won’t get a sturdy structure. You can prevent this by leveling the ground under and between the containers (to some extent) beforehand.
My final tip: you can prevent the majority of the mistakes described above by simply thoroughly reading the manual before starting. Every step in the assembly of a container canopy is described in the manual, and drawings are added to provide even better guidance. With proper assembly, you will enjoy your container canopy for longer, extending its lifespan. I hope you will enjoy using your container shelter.
We hope the above information helps you make an informed decision. If you want to know exactly what your chosen container shelter costs, please feel free to fill out our quotation tool without obligation. In the last question, enter your postcode. This will generate a quotation that we will send to you by email, showing the (transport) costs for your container shelter at a glance. You can create multiple quotations and select different options to compare them.
Would you like Kroftman to assemble your product? Please indicate this in the “remarks” field. You will see this field when filling out the quotation details. We will then contact you.
Do you still have questions? We are happy to assist you further.
