


Storage buildings

8 tips to keep the temperature stable in your storage building
8 min reading time
")
At Kroftman, we specialize in manufacturing self-build storage buildings. Our engineers have designed or sourced each component of the storage building separately (such as the doors). This is also the difference compared to a prefab storage building, where complete parts of a storage building, like the front and back facade, are delivered ready-made. We provide the individual components as a DIY kit, which you can fully assemble yourself with the help of others and materials. We have prepared a detailed assembly manual that guides you step by step through the assembly process. You will receive a printed version when you receive the storage building. Take the time to read it thoroughly. If you prefer to receive the assembly manual earlier, you can request a PDF version from us.
In this blog, we want to draw your attention to the parts that you need to customize during assembly. In case of transport damage, you can prepare for it by working on the damaged parts while customizing them. In this case, you may not need to return the damaged part and wait for a replacement. It saves you time, is better for the environment, and ensures that you have an undamaged storage building by sawing off the damaged part.
The following parts of a Kroftman storage building need to be customized during assembly:
1. The roof panels
2. The wall panels for the side walls
3. The wall panels for the front and back facade
4. The trims (or finishing profiles)
5. The gutters & downspouts
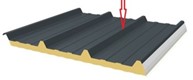
All roof panels have the same length and width dimensions. Each roof panel is long enough to cover the roof slope from ridge to eaves. You only need to cut the first and last roof panel in width to achieve a neat distribution across the roof. In other words, these two panels need to be made narrower. Before cutting, place all roof panels next to each other on the ground along the base rail. This way, you can see how much you need to cut from the first and last roof panels to fit properly. When doing this, keep in mind:
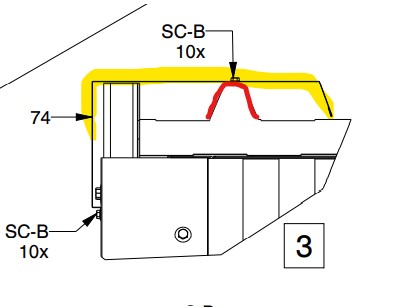
Trim overlapping the crown
For uninsulated roof panels, they do not have such high crowns, so it has less impact if the trim does not exactly overlap.
For covering the side walls, you want to distribute the cladding evenly across the building, similar to the roof, so that you don't end up with a narrow strip at the end. To prevent this, you may need to cut both the first and last panel narrower, or to size. We assume here that you don't have doors in the side walls. If you do, you also don't want a narrow strip between the doors. You will also need to customize the cladding around the door frames. More about this in paragraph 3.
Also, build the wall cladding against the prevailing wind direction to prevent rainwater from blowing in.
")
")
The wall panels used for the front and back facade are longer than those for the side walls. They need to be longer due to the additional height from the apex of the gable roof. Furthermore, due to the 15-degree roof pitch, all panels for the front and back facade need to be cut diagonally at the top to match the roof. It's not critical to be precise to the millimeter since the top of the cladding is finished with a trim. Additionally, for a standard storage building with two doors in the front facade, a roller or overhead door, and a personnel door, you will need to customize the cladding around them. Our engineers advise you on the following:
The trims, or finishing profiles, have a fixed (transport) length of about 3 meters. To finish the entire storage building, these are laid overlapping, each with an overlap of about 15-20 centimeters. Finally, you can cut the last profile to size. The finishing profiles at the gable end and the four corners need to be notched and bent for proper finishing, as indicated in the assembly manual.
Our storage buildings are delivered standard without gutters and downspouts. If you prefer rainwater to run off at a specific location, you can order the matching drainage system as an option. The Kroftman gutter system for storage storage buildings is entirely made of galvanized sheet steel. The system consists of gutters on both sides of the storage building with downpipes (plus outlet bend) to ground level. You cut the gutters to size for the length of your storage building. Furthermore, you cut a hole for the downpipe connection as indicated in the assembly manual.
Our assembly manual specifies which parts need to be cut to size. However, by reading this blog, you already know which parts these are. Here are the main tips from our engineers:
We hope the above information helps you make an informed decision. If you want to know exactly what the storage building of your choice costs, please feel free to fill out our quotation tool. From this, you will receive a quotation by email showing the costs and transportation costs for your storage building at a glance. You can create multiple quotations and select different options. This way, you can compare them effectively.
If you still have questions, we are happy to assist you.
Storage buildings
8 min reading time
Storage buildings

6 min reading time
Storage buildings

7 min reading time
From €590
Temporary storage
or work space in
an instant
From €2580
Temporary storage
or work space in
an instant
From €8700
Self-built sheds
without concrete
foundation
From €5040
Flexible
industry-quality
storage space